PSoc™62开发板之PWM呼吸灯
实验目的
利用PWM动态调节输出功率达到控制LED呼吸变化的效果
实验准备
- PSoc62™开发板(开发板已经板载LED)
板载资源
板载有多少pwm
创建工程例程,在libraries/HAL_Drivers/drv_pwm.h中查看BSP支持的pwm数量及对应的GPIO,可以看到一共有8路pwm
/*
 * Copyright (c) 2006-2023, RT-Thread Development Team
 *
 * SPDX-License-Identifier: Apache-2.0
 *
 * Change Logs:
 * Date           Author       Notes
 * 2022-07-13     Rbb666       first version
 */

#ifndef __PWM_CONFIG_H__
#define __PWM_CONFIG_H__

#include <rtthread.h>
#include <board.h>

#ifdef __cplusplus
extern "C"
{
#endif

#define MAX_PERIOD 65535

#ifdef BSP_USING_PWM0
#ifndef PWM0_CH0_PORT0_CONFIG
#define PWM0_CH0_PORT0_CONFIG       \
    {                               \
        .name = "pwm0",             \
        .channel = 0,               \
        .gpio = GET_PIN(0, 0),      \
    }
#endif /* PWM0_CH7_PORT2_CONFIG */

#ifndef PWM0_CH7_PORT2_CONFIG
#define PWM0_CH7_PORT2_CONFIG       \
    {                               \
        .name = "pwm0",             \
        .channel = 7,               \
        .gpio = GET_PIN(2, 2),      \
    }
#endif /* PWM0_CH7_PORT2_CONFIG */

#ifndef PWM0_CH7_PORT5_CONFIG
#define PWM0_CH7_PORT5_CONFIG       \
    {                               \
        .name = "pwm0",             \
        .channel = 7,               \
        .gpio = GET_PIN(5, 6),      \
    }
#endif /* PWM0_CH7_PORT5_CONFIG */

#ifndef PWM0_CH7_PORT7_CONFIG
#define PWM0_CH7_PORT7_CONFIG       \
    {                               \
        .name = "pwm0",             \
        .channel = 7,               \
        .gpio = GET_PIN(7, 7),      \
    }
#endif /* PWM0_CH7_PORT7_CONFIG */

#ifndef PWM0_CH7_PORT9_CONFIG
#define PWM0_CH7_PORT9_CONFIG       \
    {                               \
        .name = "pwm0",             \
        .channel = 7,               \
        .gpio = GET_PIN(9, 4),      \
    }
#endif /* PWM0_CH7_PORT9_CONFIG */

#ifndef PWM0_CH7_PORT10_CONFIG
#define PWM0_CH7_PORT10_CONFIG      \
    {                               \
        .name = "pwm0",             \
        .channel = 7,               \
        .gpio = GET_PIN(10, 2),     \
    }
#endif /* PWM0_CH7_PORT10_CONFIG */

#ifndef PWM0_CH7_PORT12_CONFIG
#define PWM0_CH7_PORT12_CONFIG      \
    {                               \
        .name = "pwm0",             \
        .channel = 7,               \
        .gpio = GET_PIN(12, 6),     \
    }
#endif /* PWM0_CH7_PORT12_CONFIG */

#ifndef PWM0_CH3_PORT13_CONFIG
#define PWM0_CH3_PORT13_CONFIG      \
    {                               \
        .name = "pwm0",             \
        .channel = 3,               \
        .gpio = GET_PIN(13, 7),     \
    }
#endif /* PWM0_CH3_PORT13_CONFIG */
#endif /* BSP_USING_PWM0 */

#ifdef __cplusplus
}
#endif

#endif
pwm IO资源
| 编号 | channel | gpio |
|---|---|---|
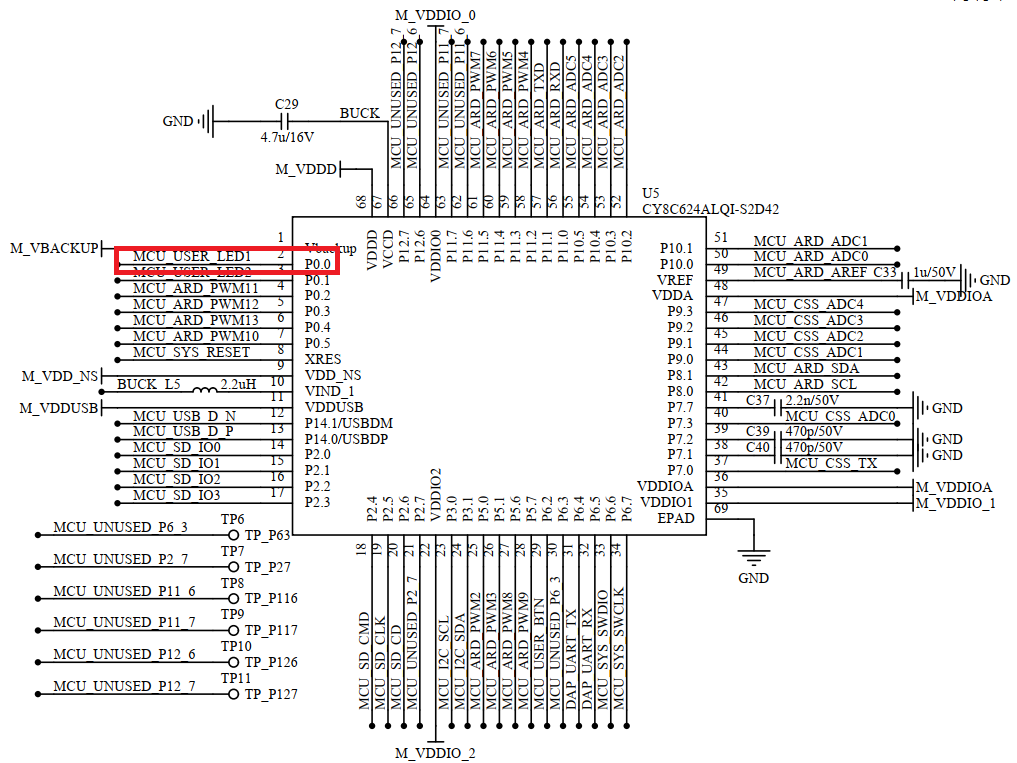
| pwm0 | 0 | P0.0 |
| pwm0 | 7 | P2.2 |
| pwm0 | 7 | P5.6 |
| pwm0 | 7 | P7.7 |
| pwm0 | 7 | P9.4 |
| pwm0 | 7 | P10.2 |
| pwm0 | 7 | P12.6 |
| pwm0 | 3 | P13.7 |
电路图
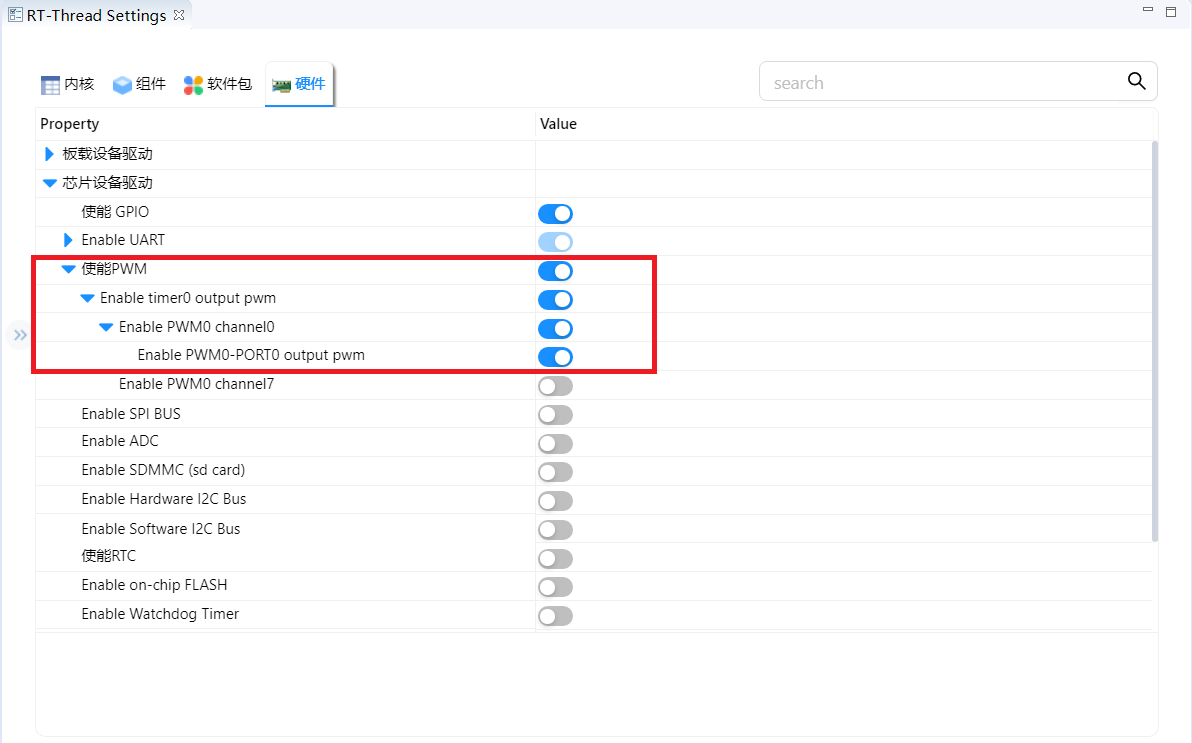
使能PWM
RT-Thread Settings,点击右边的箭头<<进入详细页,使用前先使能pwm0,如下图所示
程序设计
编码实现
#include <rtthread.h>
#include <rtdevice.h>

#include <rtthread.h>
#include "board.h"
#include <rtdevice.h>

#define PWM_LED_DEV     "pwm0"
#define PWM_CHANNEL     0

int main(void)
{
    struct rt_device_pwm *pwm_dev = RT_NULL;
    rt_uint32_t period, pulse, up;

    int gap = 2000;
    int sec = 5;

    period = 500000;
    up = 1;
    pulse = 0;

    pwm_dev = (struct rt_device_pwm *)rt_device_find(PWM_LED_DEV);
    if (pwm_dev == RT_NULL)
    {
        rt_kprintf("pwm device (%s) not found!\n", PWM_LED_DEV);
        return RT_ERROR;
    }

    rt_pwm_set(pwm_dev, PWM_CHANNEL, period, pulse);
    rt_pwm_enable(pwm_dev, PWM_CHANNEL);

    while (1)
    {
        rt_thread_mdelay(sec);
        if (up)
        {
            pulse += gap;
        }
        else
        {
            pulse -= gap;
        }

        if (pulse >= period)
        {
            up = 0;
        }
        if (0 >= pulse)
        {
            up = 1;
        }

        rt_pwm_set(pwm_dev, PWM_CHANNEL, period, pulse);
    }
}rt_pwm_set可以设定指定PWM通道的周期和占空参数
rt_pwm_enable
实验效果
运行效果如下,LED灯明亮交替地闪烁,类似于呼吸的效果
阅读剩余
版权声明:
作者:hywing
链接:https://iotstuff.cn/psoc62-mcu-pwm-led/
文章版权归作者所有,未经允许请勿转载。
THE END
